A photographic equipment resource
Transition to school is often an exciting but stressful time for the child involved as well as those around them. Having a well-planned transition process that is flexible enough to fit the needs of the individual child can minimise the stress for all and provide a positive start to school life.
Simple activities to develop hand strength and finger dexterity
BLENNZ National Assessment Service have been supporting this process for many years and two of the teachers working within this team spent time during 2010 and 2011 reviewing what is working well and making a difference for children who are blind or have low vision and are transitioning to school. As part of this project, parents, Resource Teachers Vision (RTV) and classroom teachers were surveyed to determine what works well and what suggestions they had to improve this process.
Sue Arrojado, Senior Resource Teacher Vision Early Childhood and Lesley White Classroom Teacher at BLENNZ Homai Campus have been assessing children who come to Homai Campus for a full week assessment and who are in the process of transitioning to school. As a result of this and the consultation process there was a need identified for photos of appropriate equipment with description of the skills being focused on. To begin this process, the focus of this resource is activities to develop hand strength and finger dexterity for students who are blind or have low vision who are transitioning to school.
The following activities promote the development of:
- Tactual exploration where the child begins to actively investigate the object using hand and finger movements to rub, squeeze, poke, hold, grasp, pull, push and turn. This may need to be modelled using ‘hand under hand’ to initially teach the movements.
- Hand and finger development including whole hand grasp (palmar grasp), grasping with thumb and fingers, pincer grasp (thumb and first finger) and controlled release of grasp. They also include opportunities for the practice of rotary motion from the wrist, finger isolation, using two hands together, hand and finger strength and touch sensitivity.
- Language and concepts to describe tactual experiences such as weight, temperature, surface texture, size, and shape as well as positional and spatial concepts such as on, in, under, behind, beside, together, left and right.
- Social skills such as turn taking, sharing and completion of an activity.
The activities have been organised into categories according to skill areas:
Finger/hand strength
Squeaky Ball
- Strengthen hands and fingers
- Cause and effect
- Two hands together or individual hand
Ideas
- Opportunity for comparison and generalisation of what a ball is
- An opportunity to bring in language and concepts about balls such as round, bounce, roll, big, little, catch, spiky etc.
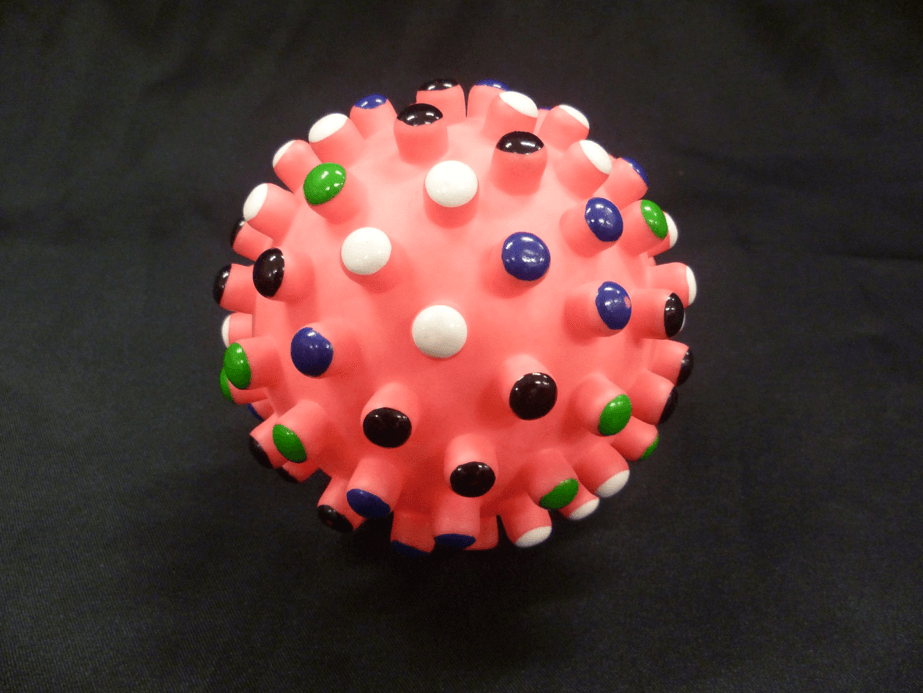
Figure 1 - Squeaky ball
Bike horns
- Strengthen hand and fingers
- Cause and effect
- Individual hand use (beginning of hand dominance)
- Problem solving (e.g. if end of horn covered, sound changes)
- Controlled hand movement to get desired result
Ideas
- Use the horn to put the sound effects into songs about cars or traffic
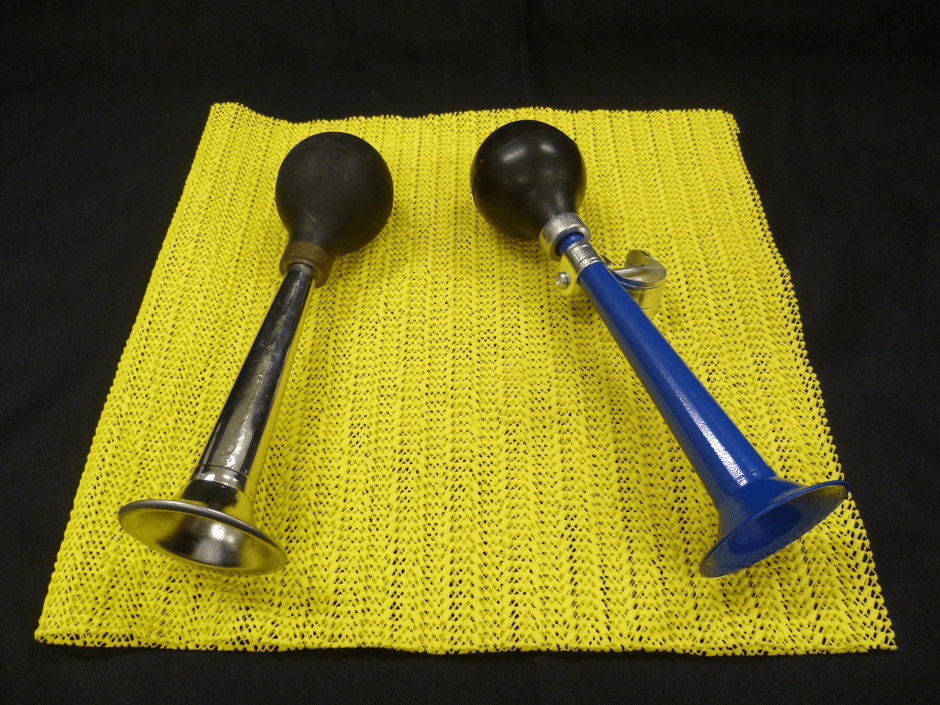
Figure 2 - Bike horns
Playdough
- Filling containers, measuring ingredients, stirring the mixture, sprinkling flour on the surface where the dough is kneaded
- Pulling, squeezing, rolling on a surface, rolling in hands, pressing and kneading
- Isolating fingers to make holes in dough
Ideas
- Adding essential oil or a tactile component such as wheat to give additional sensory experiences
- Using tools such as a rolling pin, knife and cookie cutters
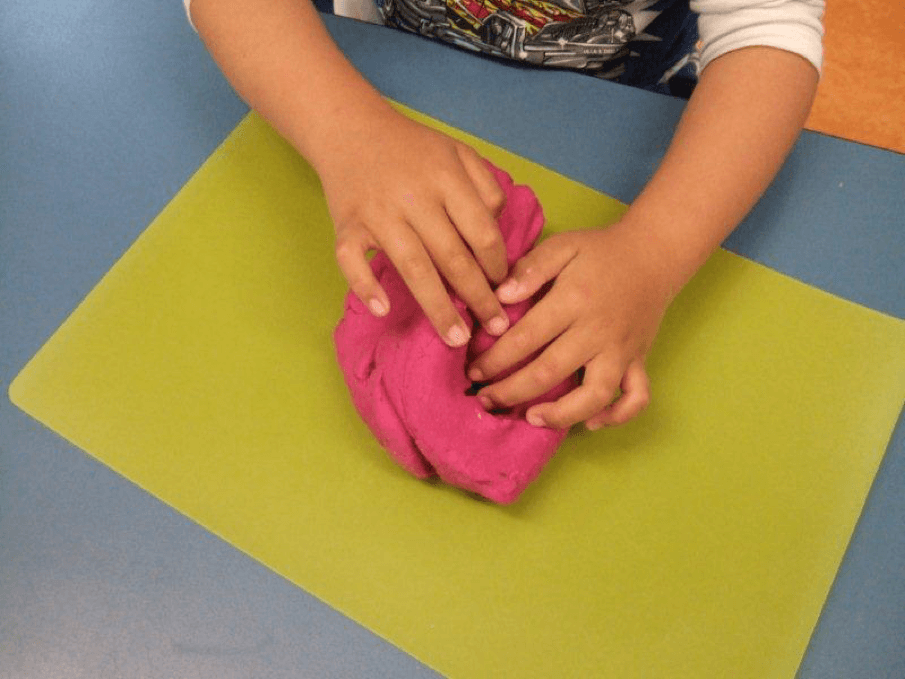
Figure 3 – Playdough
Finger paint
- Whole hand experience
- Finger isolation
- Isolation of index finger to draw/write/scribble
Ideas
- Gloop (cornflour and water)
- Sensory Art recipes
- Add essential oils for smell component
- Use wet sand as an alternative activity (gives more resistance)
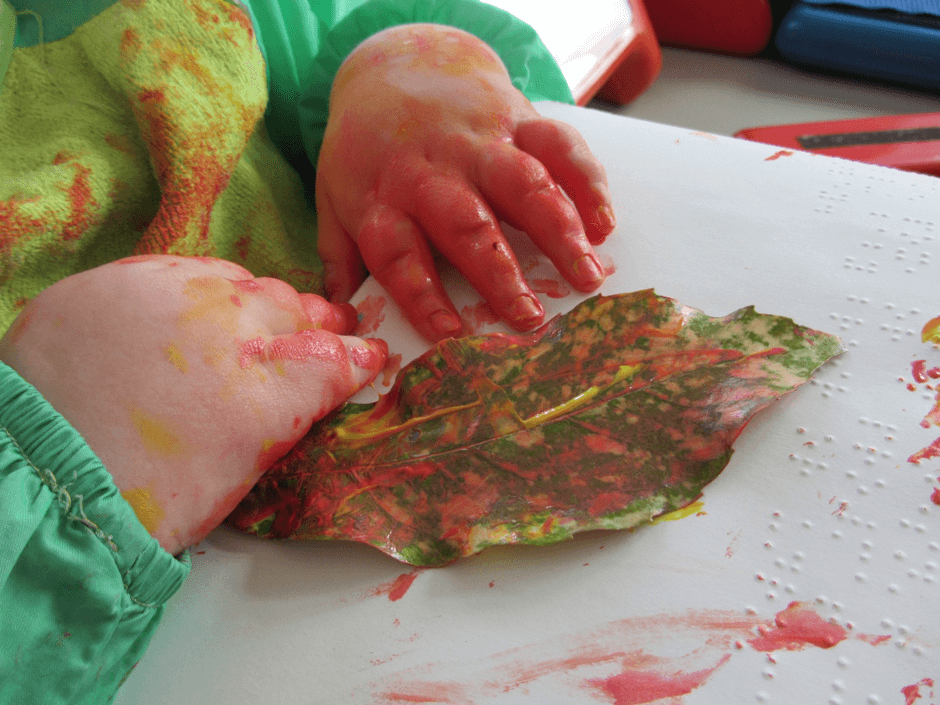
Figure 11 - Finger paint
Finger isolation
Bubble wrap
- Individual finger strength
- Finger isolation
- Cause and effect
- Working from top to bottom and left to right
Ideas
- Tape the bubble wrap to a surface and use finger paint on it
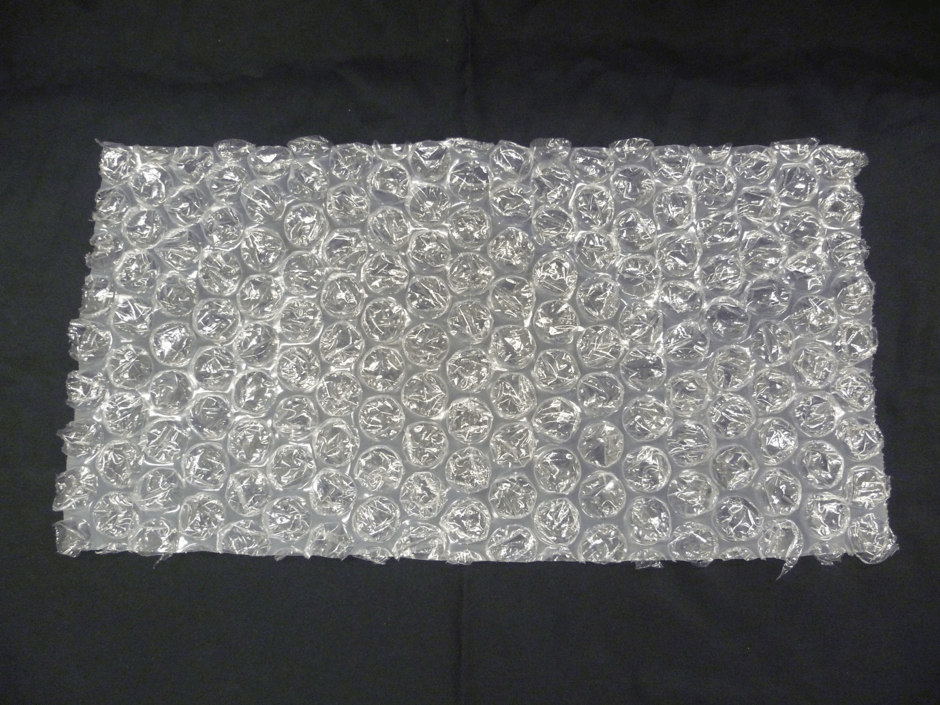
Figure 3 - Bubble wrap
Clothes pegs
- Pincer grip
- Individual finger strength
- Problem solving (e.g. push, squeeze)
- Experience different materials
- Lead to real life activity
Ideas
- Different kinds of pegs could be sorted by material they are made of or by action required e.g. push or squeeze
- Use pegs in a real activity of hanging socks on a line
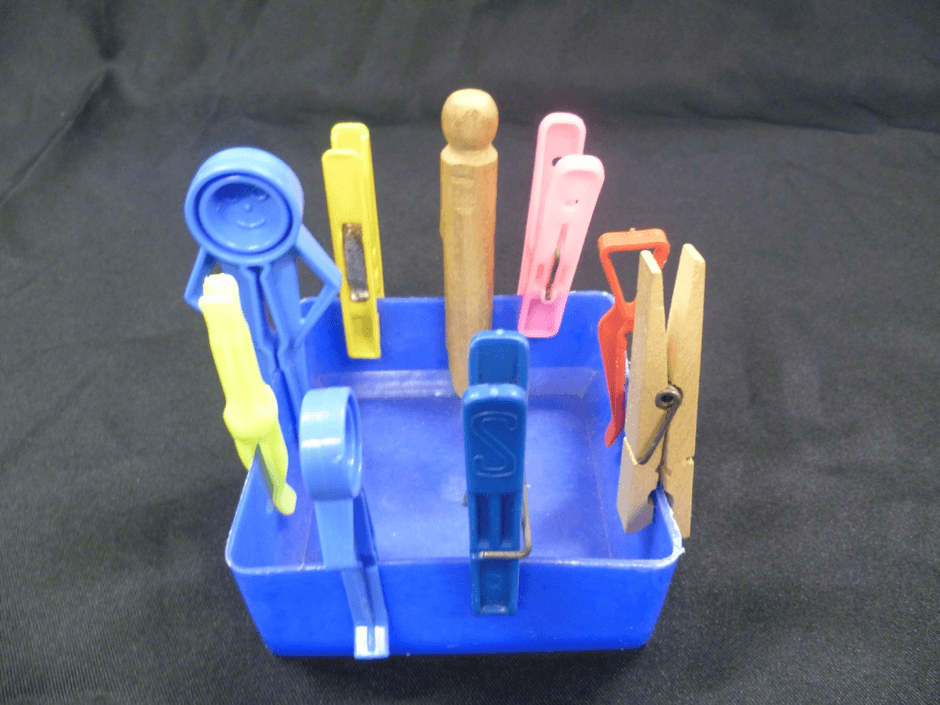
Figure 6 - Clothes pegs
Keyboard/piano
- Using both hands together and possibly whole hand
- Finger isolation
- Similar movement to that required when brailling
- Coordination where hands may do different things at the same time
- Push down with curved fingers and wrists up rather than a pull down with fingers only if wrists are flat or resting
Ideas
- When learning to braille, to encourage a correct hand position, place the brailler inside the lid of an A3 photocopy paper box. This reminds the students to lift their wrists and push the keys down.
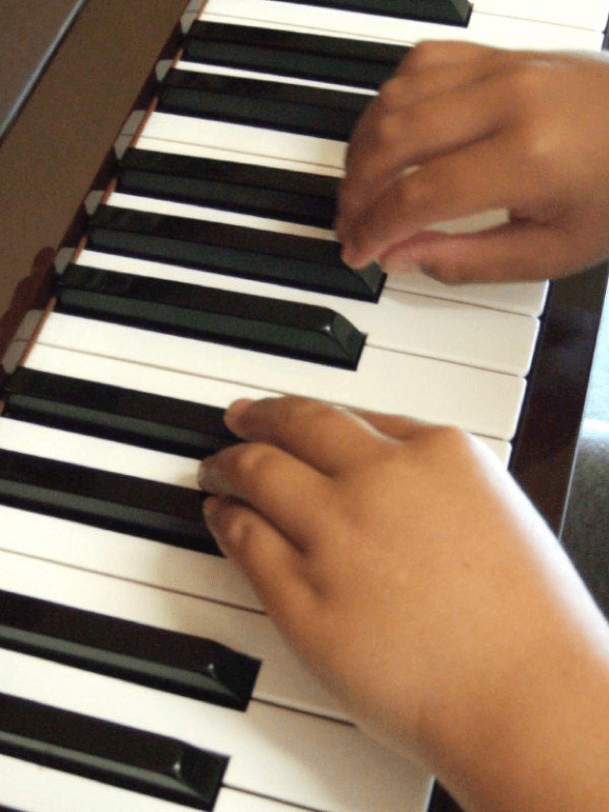
Figure 7 - Piano/keyboard
Toys with buttons/knobs
- Push down with flat hand/turn knobs
- Location of button
- Finger isolation to activate/push button
- Holding with one hand while activating with the other hand
- Problem solving the way to activate the components of more complex toys

Figure 13 - Toys with buttons and knobs
Stickers
- Pincer grip to peel sticker from page
- Using two hands together to hold/place and to locate where to stick them
Ideas
- Make lines of full braille cell and get the child to follow the line and place the sticker at the end. Turn the page on its side so the stickers are at the top, and you have a row of lollipops.
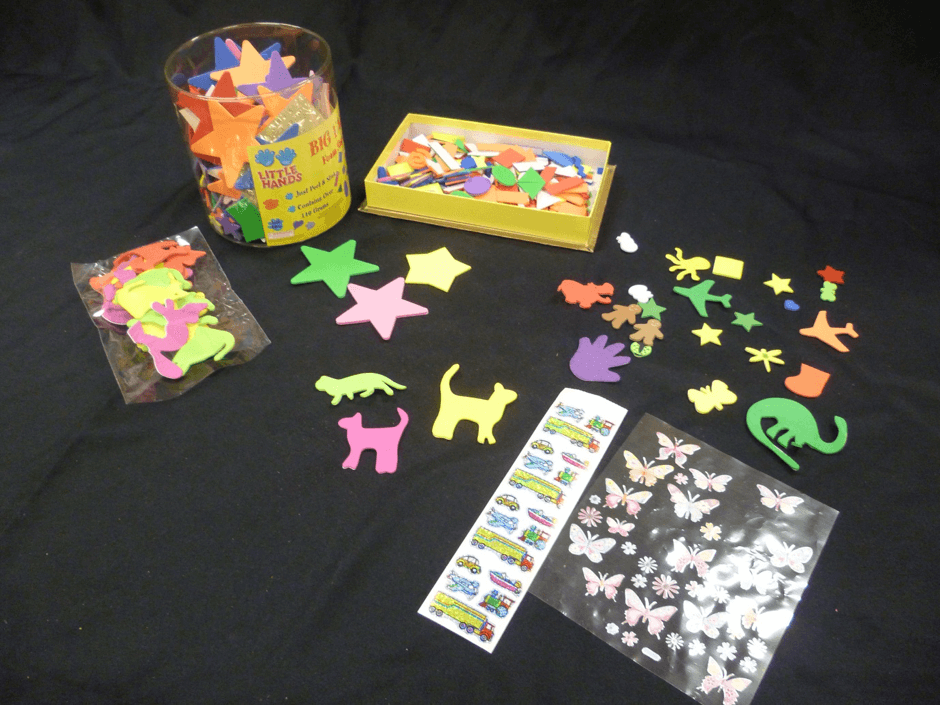
Figure 14 - Stickers
Two hands
Wind-up toys
- Pincer grip
- Individual finger strength
- Two hands together
- Problem solving
- Aural tracking
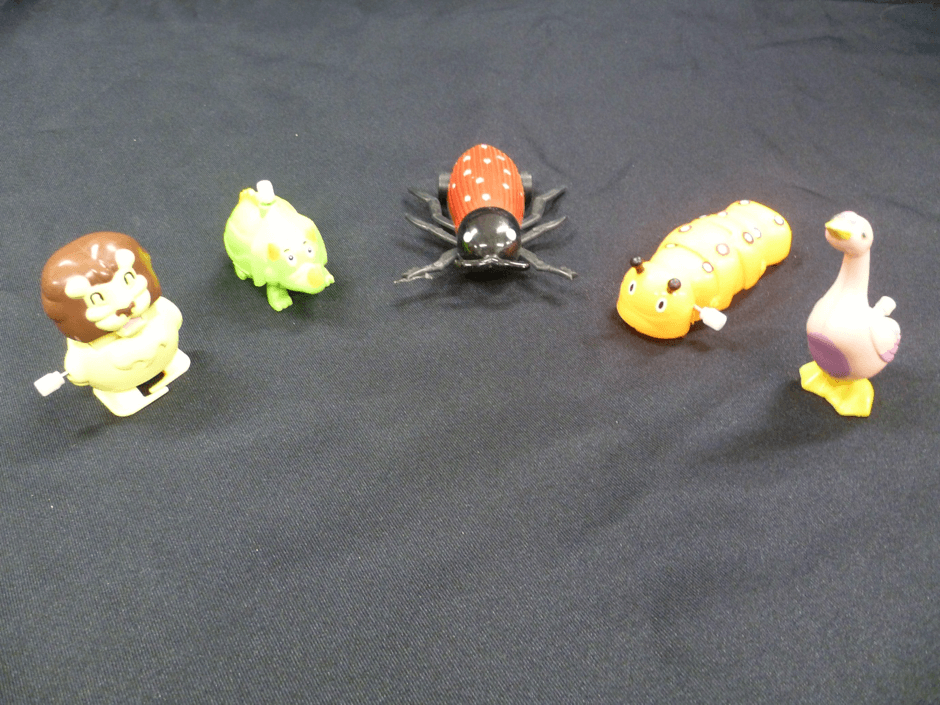
Figure 5 - Wind-up toys
Hole punch
- Two hands together (insert and push)
- Coordination of two hands doing different tasks e.g. hold the paper and push the handle
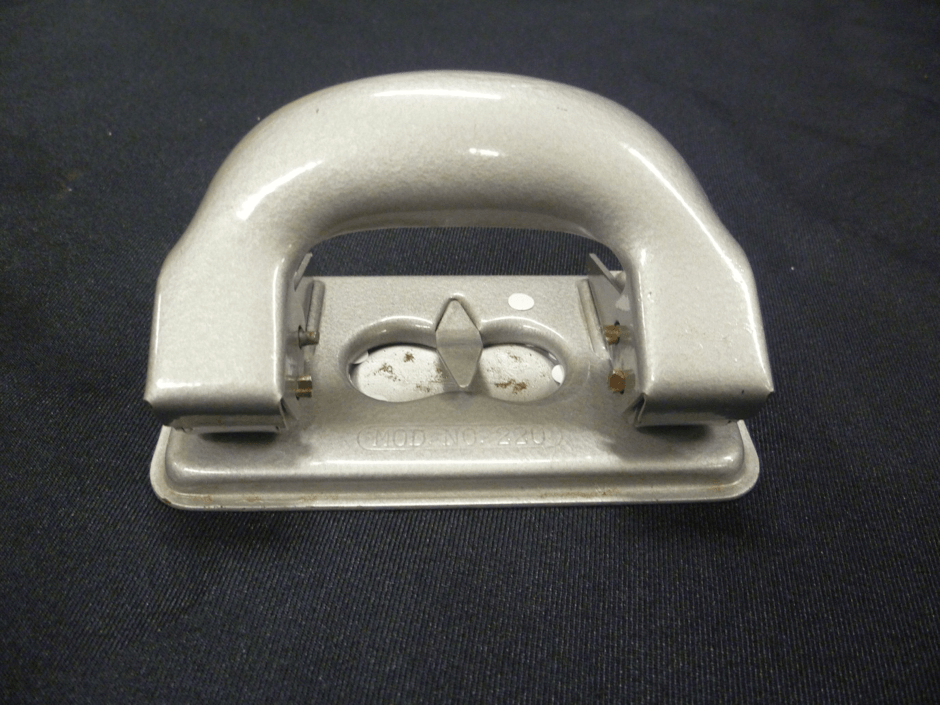
Figure 6 - Hole punch
Paper
- Using two hands to tear paper
- Screwing up paper and rolling into balls
- Mastering pressing down a stapler
- Opportunity to make new paper from torn tissue paper using a pincer grip and tearing into very small pieces (concept development)
Ideas
- Stuffing animal shapes
- Paper maché
Figure 12 - Paper
Perfume bottles
- Using two hands to pull lid off (variation of pressure and strength required)
- Aligning lid to top of bottle and pushing back on
- Different sorts of tops for different sorts of bottles (discrimination of size, shape, surface texture and possibly smell)
Ideas
- Could be part of dress up play

Figure 9 - Perfume bottles
Squeeze bottles
- Using two hands together
- Direction of squeeze e.g. squirting a pattern on fence or concrete, watering the garden, holding overhead for a shower
- Strength and coordination
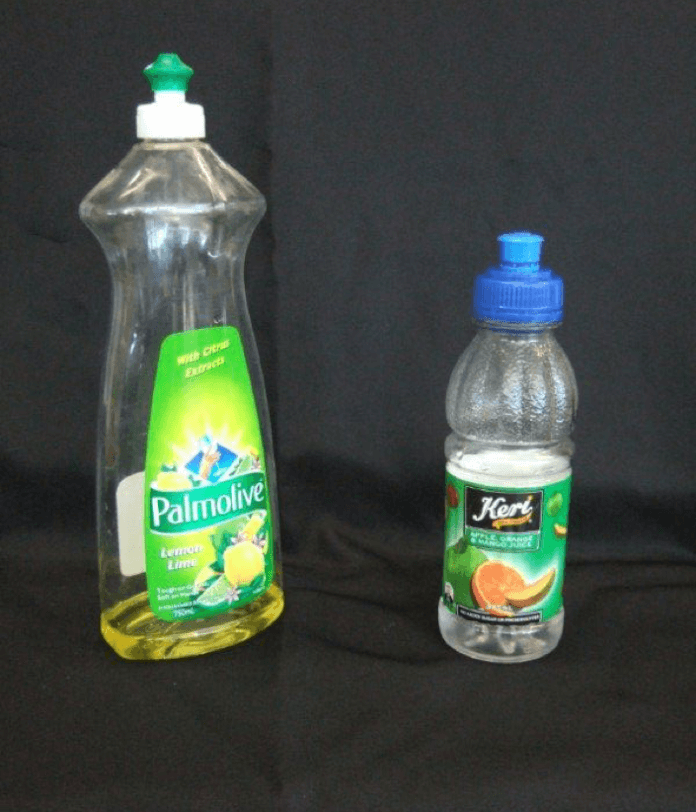
Figure 14 - Squeeze bottles
Screw top bottles/jars
- Using two hands together for screwing lids on and off
- Doing a different job with each hand
- Wrist rotation
- Matching lids to bottles/jars (size/shape)
- Coordination to position lid accurately on jar/bottle
Ideas
- Place equipment or perhaps morning tea biscuits/raisins inside a container and get the student to remove the lid
- Use a variety of containers with lids that lift off in various ways e.g. Tupperware lid and click clack containers
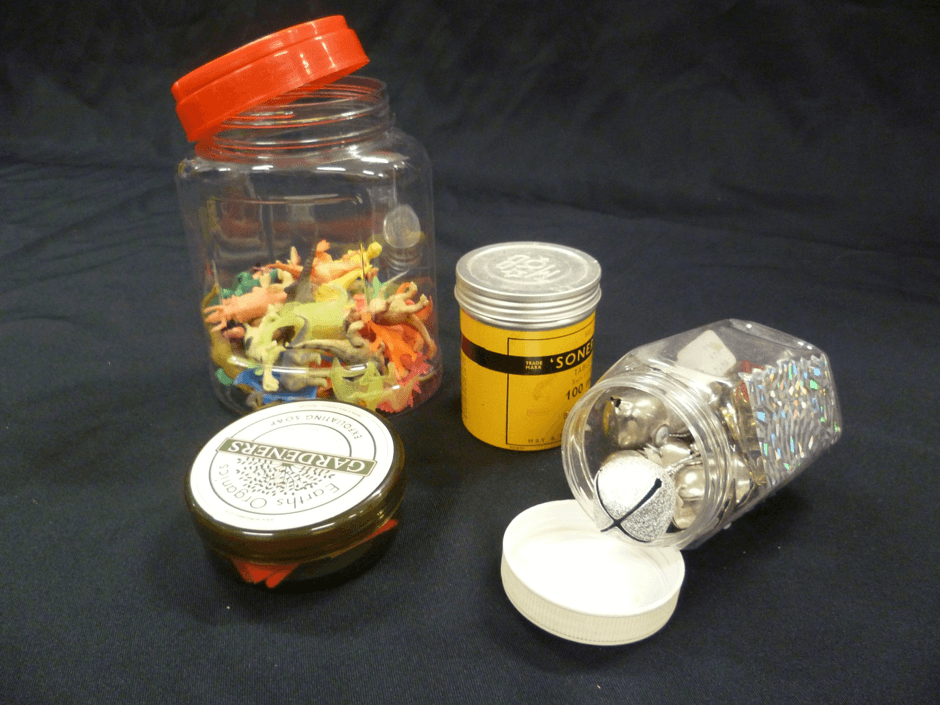
Figure 15 - Screw top bottles/jars
Pop beads
- Using two hands together
- A coordinated push and pull motion
- Organising which way around the beads need to be held so that they will fit together
- Fine motor control when using smaller beads
- Strength for larger beads
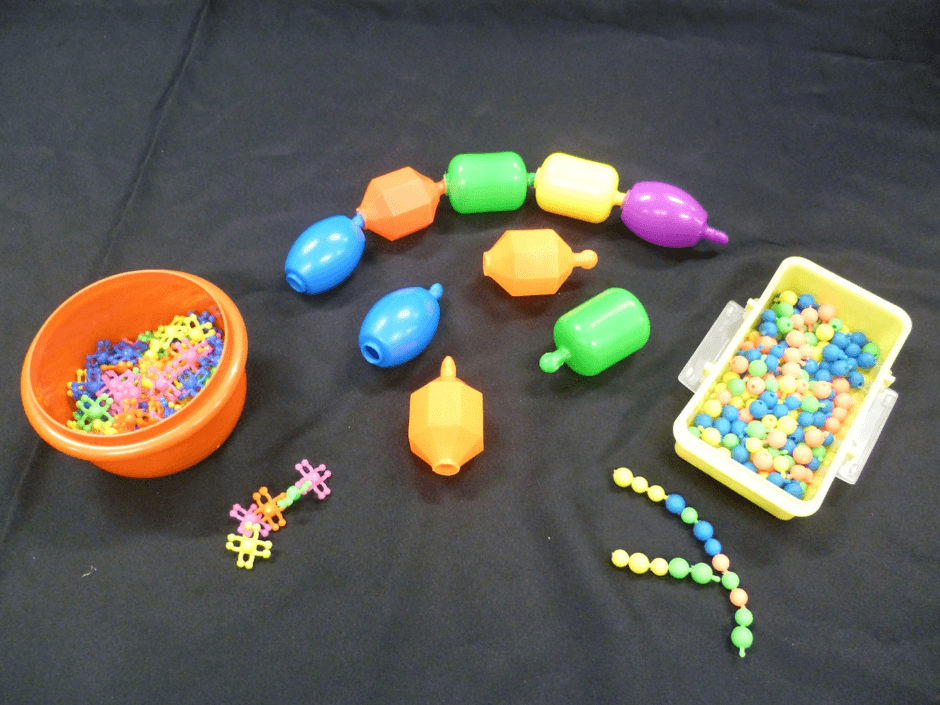
Figure 16 - Pop beads
Stringing/threading beads
- Fine motor activity requiring both hands doing different tasks and changing tasks throughout the activity (complex)
- Identifying different shapes through touch (fine discrimination)
Ideas
- Start with a solid threader such as dowel and large beads and progress to shoe laces or plastic tubing
- Thread a pattern to encourage shape/colour identification
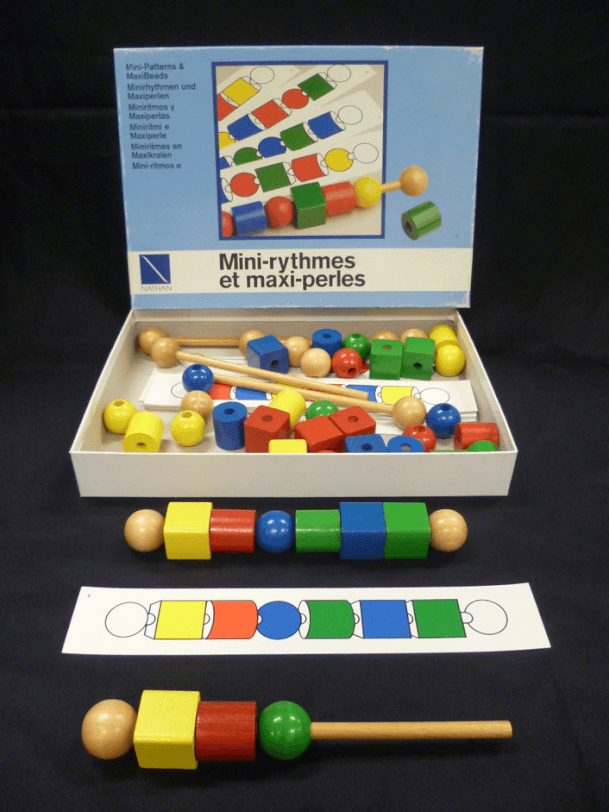
Figure 17 - Stringing/threading beads
Pegboard
- Two hands working together, one to find the hole and one to place the peg (pointer and pincer grip)
- Starting top left and moving along the line
- Removing pegs from pegboard and placing into low sided tray
- Placing pegs correctly in holes
- Searching/scanning with both hands to find the last peg
Ideas
- Opportunity to teach a search pattern of tray area and of pegboard to ensure all holes are filled
- Stacking into towers
- Shape identification and sorting

Figure 18 - Pegboards
Car/train track
- Using both hands together to place the train at the top
- Using organised release and correct placement on the track for it to work
- Following the sound as it moves down the track and locating the train at the bottom
- Adjusting hand position to accommodate either the large or small train (small train can be used with one hand but large requires two hands)
Ideas
- Opportunity to teach positional language e.g. top, bottom, high, low, left, right, up, down, and between the track edges
- Teaching the concept of slope and then transferring it to other things in the environment e.g. to consolidate
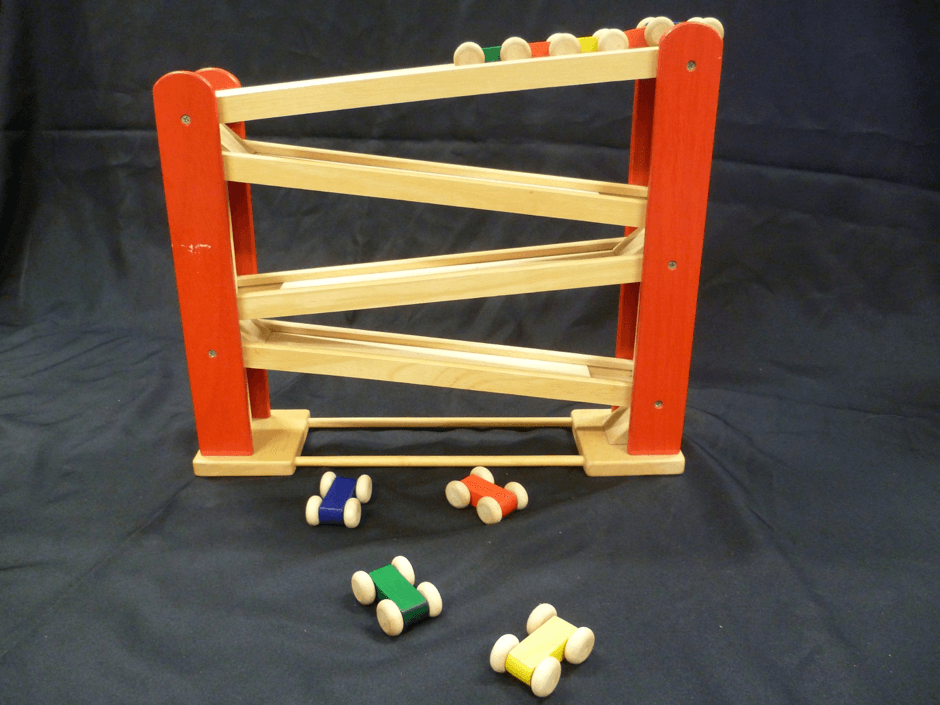
Figure 19 - Car/train track
Duplo/Lego, Mobilo, Magnetic blocks
- Using two hands together
- Pulling and pushing motion
- Lining up pieces to fit correctly
- Adapting hand function for different sizes/types of blocks e.g. whole hand required for holding larger blocks, fine motor/finger control is required for smaller blocks.
Ideas
- Opportunity to explore magnetic fields with magnetic blocks and build understanding of which way around the blocks need to go to attract
- Developing concepts such as corner, edge, on top, under, and beside
- When making a “house”, there is opportunity to explore the pattern of brick work and tile floors, and then transfer that knowledge to block play.
- Learning how to fit blocks together to cover space (make a floor without holes to cover the base board) and to build stable towers
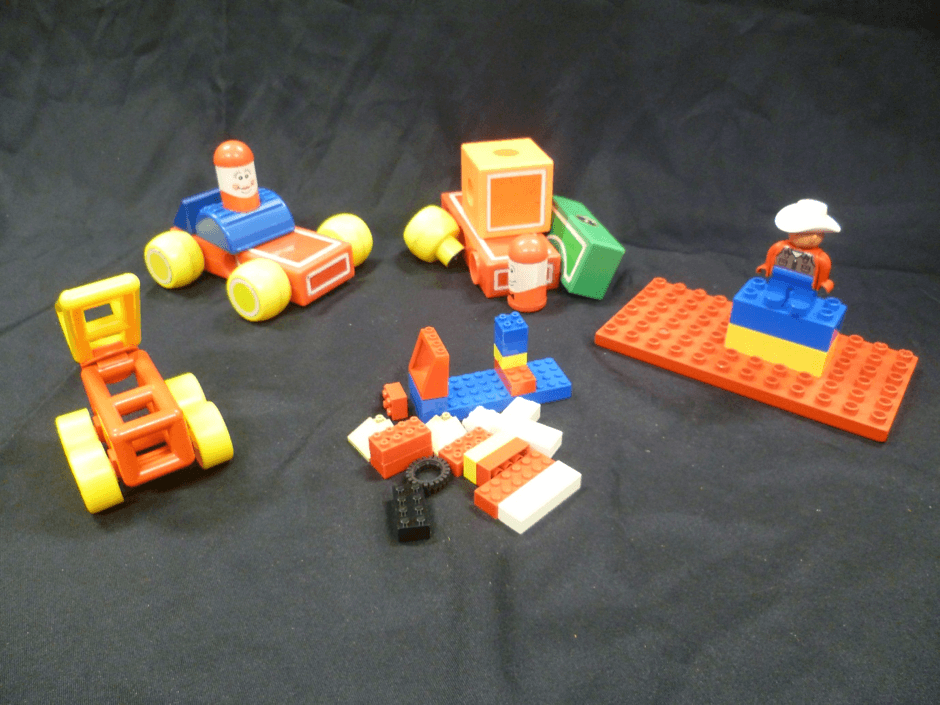
Figure 20 - Duplo/Lego, Mobilo, magnetic blocks
Nuts and bolts
- Using two hands together but each hand doing a different task e.g. one holding and one turning
- Using fine discrimination to match shapes and to identify the nut and the bolt
- The reverse process of undoing the nuts and bolts
Ideas
- Give the child the opportunity to take apart the nuts and bolts they have put together to allow them to experience the reverse process
- The child is likely to experiment with hand dominance and learn which is more comfortable for them
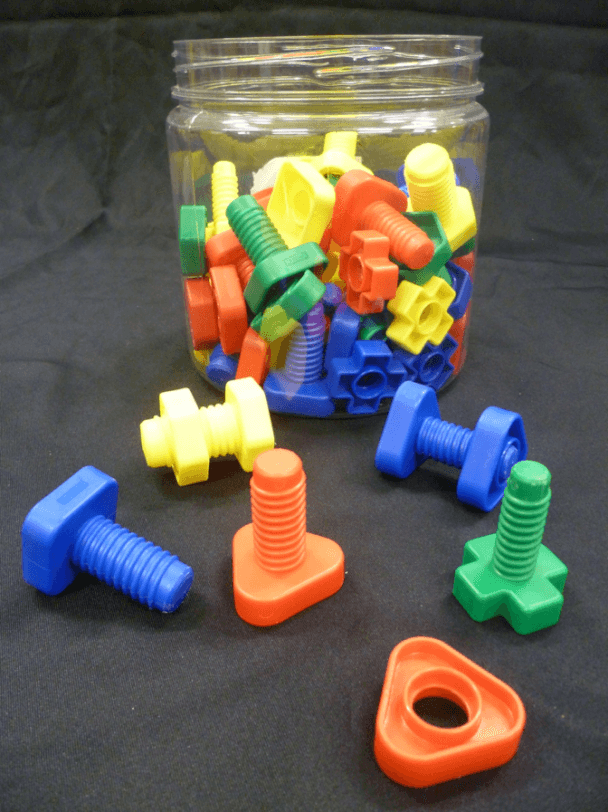
Figure 21 - Nuts and bolts
Stacking
- Using two hands together: one to hold and one to stack
- Using fingers to position the object correctly to place it
- Opportunity to develop spatial awareness e.g. locating the object and accurately locating the stack to put it on
Ideas
- Positional and height language such as top, bottom, in, on, tall, same, different, between and under
- Concept of size if using seriated stacking cups
- Transfer skills to stacking pegs in peg boards, blocks, stacking cups, plates, buckets
- Use a low sided tray to contain pieces of equipment
Figure 22 - Stacking
Domino boards
- Using two hands together
- Using fingers to find the same shape
- Working from left to right within the boundary of the tray
- Aligning the blocks so the shapes go together within the tray
Ideas
- Skills can be transferred to tactile domino games
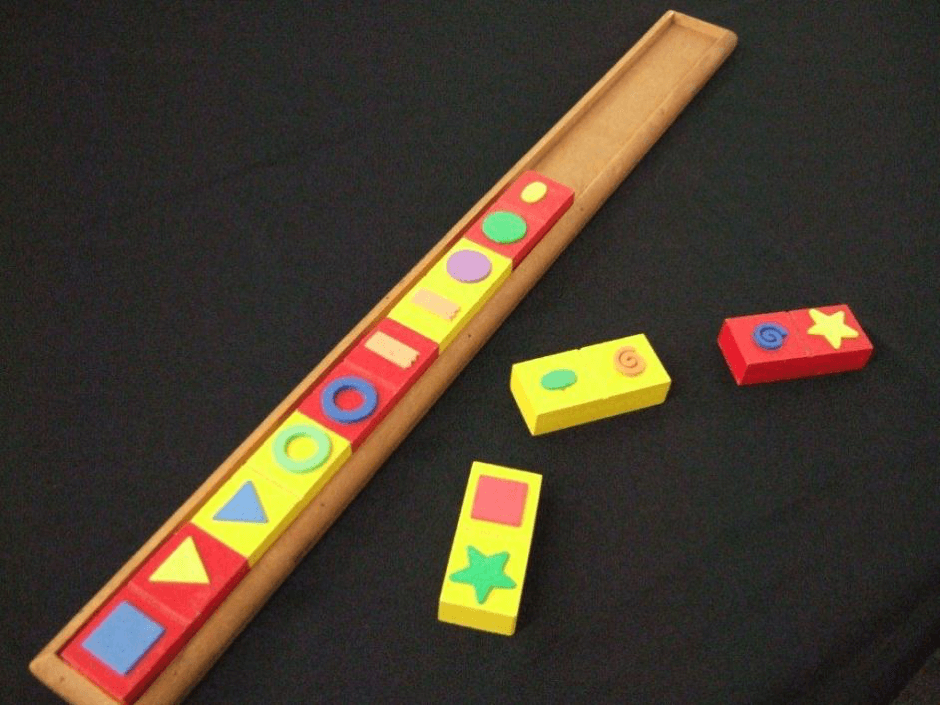
Figure 23 - Domino boards
Form boards
- Using two hands together, each doing a different task e.g. one to find the space and one to place the piece
- Using fingers of both hands to align the piece in the correct space
- Locating and holding on to the knob with the fingers
Ideas
- Begin with a one or two piece circle form board
- Velcro shapes can be placed on one edge of shape and board (as pictured) to assist with the aligning of the piece in the space. When completing a two piece puzzle, the Velcro can be placed across the join (as pictured). Ensure soft Velcro is used.
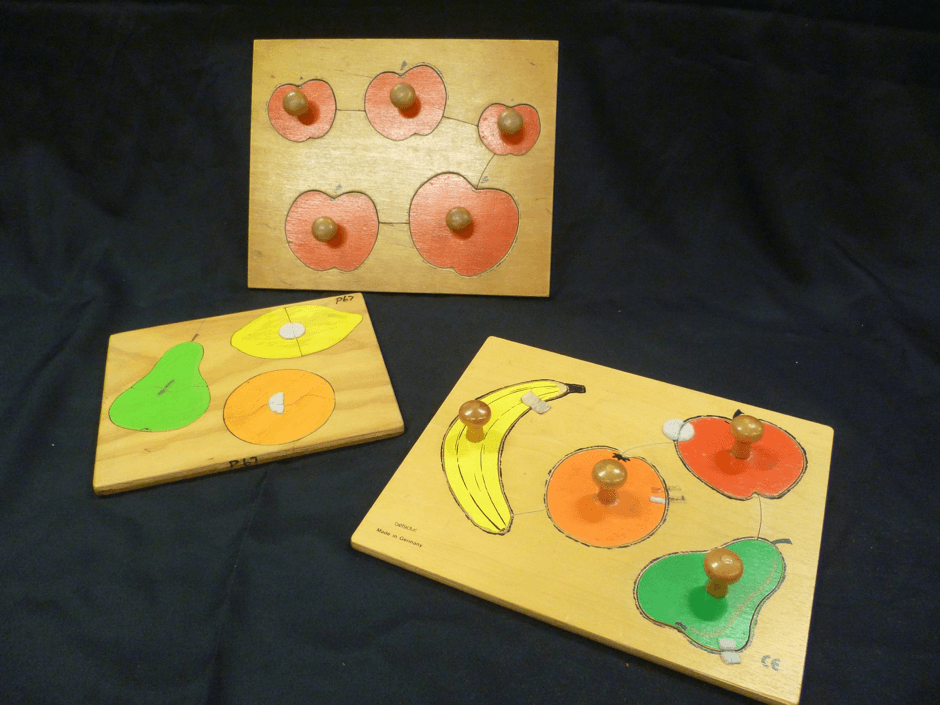
Figure 24 - Form boards
Real objects
- Exploring a range of real objects gives opportunity to use whole hand, fingers and finger tips to gain knowledge of texture, shape, size, weight, material and so on. It is important to accompany exploration with simple descriptive language.
Ideas
- Keep in mind that children will often stop exploring to listen to what is being said. Time to explore and then time to revisit and talk about the properties of the object will allow processing and learning.
- Wherever possible, allow the child to gather the objects during walks and outings e.g. a trip to the beach may include collecting some sand, shells, seaweed, pebbles, smooth glass, feathers, driftwood and starfish. It is important to repeat the experience and re-explore the objects many times to consolidate and extend understanding.
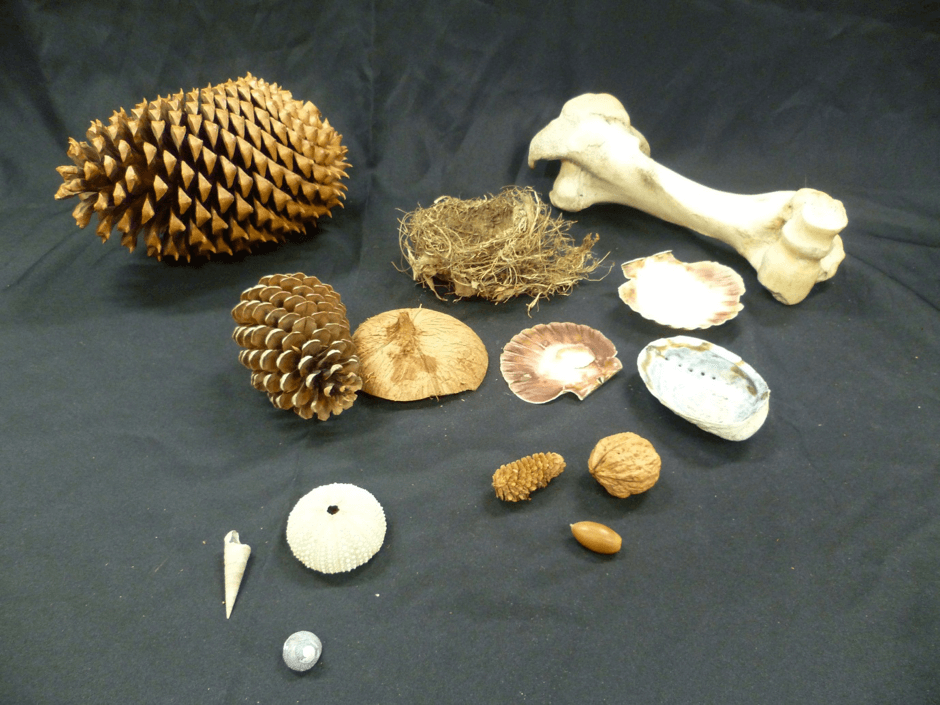
Figure 25 - Real objects
Sorting
Sorting
- Using hands and fingers to tell the difference between objects
Ideas
- Begin by using objects that are familiar to the child and are very different in size and shape e.g. spoons and bottle tops
- As part of the activity process, allow the child to take the lid off the container and replace it when finished
- Use a tactile sticker on the lid and the container to help the child match them correctly
- Remember to use appropriate natural materials e.g. leaves, acorns, pebbles, walnuts and shells
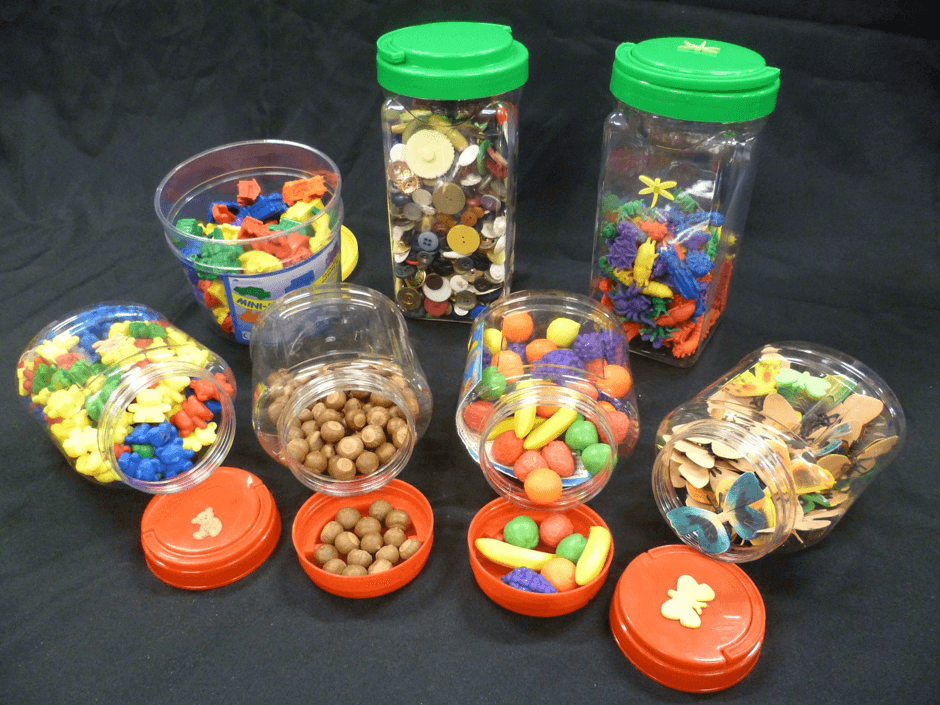
Figure 26 - Sorting
Formal sorting
- Discriminating between objects and using two hands together to place them in the appropriate space, as instructed
Ideas
- Can use a range of containers to sort into e.g. tins, bowls, ice cream containers, trays, boxes or a divided container as pictured
- Start with objects that are very different in shape and size and with just a few of each sort
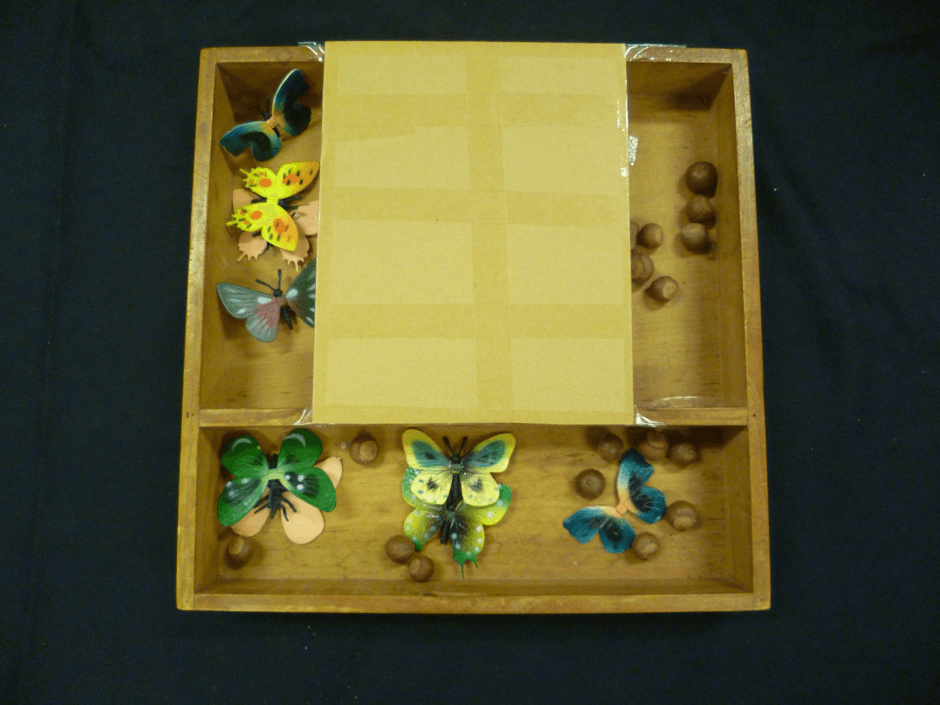
Figure 27 - Formal sorting
Velcro boards/objects
- Two handed activity, one hand to hold and one to place/cut or two hands to pull.
- Learning that Velcro has two parts and they need to be aligned correctly to make them stick.
- Requires strength and control to put together and pull apart.
Ideas
- Opportunities for sorting activities, pattern making, tracking, and the practice of spatial and positional concepts.
- Use of environmental materials such as shells, bottle tops, keys, etc.
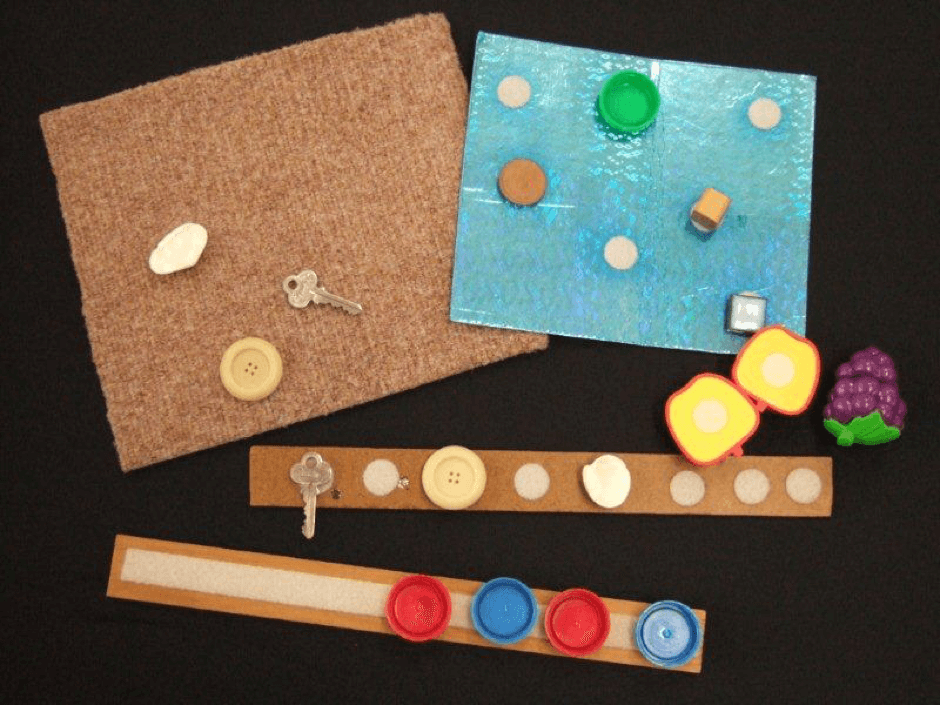
Figure 28 - Velcro boards/objects